IT俱乐部-城北日常经验分享
转发 CentOS 6、7下pptp vpn一键安装脚本,安装起来十分方便简单。正常情况下两分钟就安装好可以正常使用!!!
关键命令:
wget http://mirrors.linuxeye.com/scripts/vpn_centos.sh
chmod +x ./vpn_centos.sh
./vpn_centos.sh
就这三句。然后输入VPN的帐号 密码就完事了。很简单,十分适应像城北一样的新手。菜鸟收藏备用吧!
CentOS 6、7下pptp vpn一键安装脚本,安装如下:
wget http://mirrors.linuxeye.com/scripts/vpn_centos.sh
chmod +x ./vpn_centos.sh
./vpn_centos.sh
可以自己 把文件下载去修改,但关键的地方不建议修改,改错了麻烦除非你是大神。
脚本内容如下(vpn_centos.sh):
#!/bin/bash
#
# Author: yeho <lj2007331 AT gmail.com>
# Blog: //blog.linuxeye.com
#
# Installs a PPTP VPN-only system for CentOS
# Check if user is root
[ $(id -u) != "0" ] && { echo -e "\033[31mError: You must be root to run this script\033[0m"; exit 1; }
export PATH=/usr/local/sbin:/usr/local/bin:/sbin:/bin:/usr/sbin:/usr/bin
clear
printf "
#######################################################################
# LNMP/LAMP/LANMP for CentOS/RadHat 5+ Debian 6+ and Ubuntu 12+ #
# Installs a PPTP VPN-only system for CentOS #
# For more information please visit //blog.linuxeye.com/31.html #
#######################################################################
"
[ ! -e '/usr/bin/curl' ] && yum -y install curl
VPN_IP=`curl ipv4.icanhazip.com`
VPN_USER="linuxeye"
VPN_PASS="linuxeye"
VPN_LOCAL="192.168.0.150"
VPN_REMOTE="192.168.0.151-200"
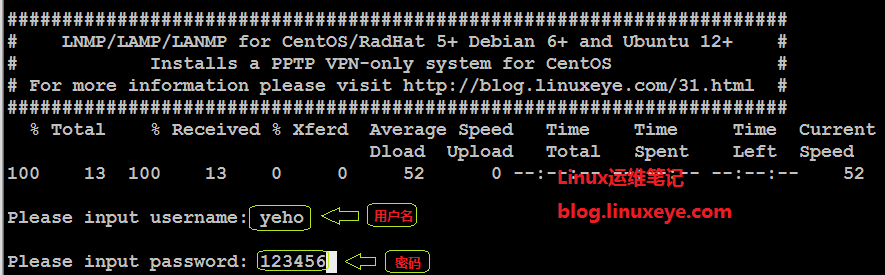
while :; do echo
read -p "Please input username: " VPN_USER
[ -n "$VPN_USER" ] && break
done
while :; do echo
read -p "Please input password: " VPN_PASS
[ -n "$VPN_PASS" ] && break
done
clear
if [ -f /etc/redhat-release -a -n "`grep ' 7\.' /etc/redhat-release`" ];then
#CentOS_REL=7
if [ ! -e /etc/yum.repos.d/epel.repo ];then
cat > /etc/yum.repos.d/epel.repo << EOF
[epel]
name=Extra Packages for Enterprise Linux 7 - \$basearch
#baseurl=http://download.fedoraproject.org/pub/epel/7/\$basearch
mirrorlist=https://mirrors.fedoraproject.org/metalink?repo=epel-7&arch=\$basearch
failovermethod=priority
enabled=1
gpgcheck=0
EOF
fi
for Package in wget make openssl gcc-c++ ppp pptpd iptables iptables-services
do
yum -y install $Package
done
echo 'net.ipv4.ip_forward = 1' >> /etc/sysctl.conf
elif [ -f /etc/redhat-release -a -n "`grep ' 6\.' /etc/redhat-release`" ];then
#CentOS_REL=6
for Package in wget make openssl gcc-c++ iptables ppp
do
yum -y install $Package
done
sed -i '[email protected]_forward.*@net.ipv4.ip_forward = 1@g' /etc/sysctl.conf
rpm -Uvh http://poptop.sourceforge.net/yum/stable/rhel6/pptp-release-current.noarch.rpm
yum -y install pptpd
else
echo -e "\033[31mDoes not support this OS, Please contact the author! \033[0m"
exit 1
fi
echo "1" > /proc/sys/net/ipv4/ip_forward
sysctl -p /etc/sysctl.conf
[ -z "`grep '^localip' /etc/pptpd.conf`" ] && echo "localip $VPN_LOCAL" >> /etc/pptpd.conf # Local IP address of your VPN server
[ -z "`grep '^remoteip' /etc/pptpd.conf`" ] && echo "remoteip $VPN_REMOTE" >> /etc/pptpd.conf # Scope for your home network
if [ -z "`grep '^ms-dns' /etc/ppp/options.pptpd`" ];then
cat >> /etc/ppp/options.pptpd << EOF
ms-dns 223.5.5.5 # Aliyun DNS Primary
ms-dns 114.114.114.114 # 114 DNS Primary
ms-dns 8.8.8.8 # Google DNS Primary
ms-dns 209.244.0.3 # Level3 Primary
ms-dns 208.67.222.222 # OpenDNS Primary
EOF
fi
echo "$VPN_USER pptpd $VPN_PASS *" >> /etc/ppp/chap-secrets
ETH=`route | grep default | awk '{print $NF}'`
[ -z "`grep '1723 -j ACCEPT' /etc/sysconfig/iptables`" ] && iptables -I INPUT 4 -p tcp -m state --state NEW -m tcp --dport 1723 -j ACCEPT
[ -z "`grep 'gre -j ACCEPT' /etc/sysconfig/iptables`" ] && iptables -I INPUT 5 -p gre -j ACCEPT
iptables -t nat -A POSTROUTING -o $ETH -j MASQUERADE
iptables -I FORWARD -p tcp --syn -i ppp+ -j TCPMSS --set-mss 1356
service iptables save
sed -i 's@^-A INPUT -j REJECT --reject-with icmp-host-prohibited@#-A INPUT -j REJECT --reject-with icmp-host-prohibited@' /etc/sysconfig/iptables
sed -i 's@^-A FORWARD -j REJECT --reject-with icmp-host-prohibited@#-A FORWARD -j REJECT --reject-with icmp-host-prohibited@' /etc/sysconfig/iptables
service iptables restart
chkconfig iptables on
service pptpd restart
chkconfig pptpd on
clear
echo -e "You can now connect to your VPN via your external IP \033[32m${VPN_IP}\033[0m"
echo -e "Username: \033[32m${VPN_USER}\033[0m"
echo -e "Password: \033[32m${VPN_PASS}\033[0m"
以上文件是参考:https://github.com/drewsymo/VPN 所做修改得来的。
全文详见:http://it-club.cn/post/58.html
评论列表


最新文章
标签列表
最新留言
站点信息
- 文章总数:802
- 页面总数:1
- 分类总数:4
- 标签总数:29
- 评论总数:265
- 浏览总数:17407366